How to Build a DIY Bird Nesting Box: Step-by-Step Guide
There’s something special about walking into your garden and hearing cheerful birdsong echoing through the trees. One of the easiest ways to invite birds to make your garden their home is by adding a nesting box—and it’s a weekend project almost anyone can tackle.
As natural habitats continue to shrink, many birds struggle to find safe places to raise their young. By building your own bird nesting box, you’re offering them shelter and security—while enriching your outdoor space at the same time.
In this step-by-step guide, you’ll learn how to build a durable, bird-safe nesting box using basic tools and materials. Whether you’re brand-new to DIY or already have some experience, these simple steps will help you create a welcoming home for birds—no complex plans or expensive tools required.
Why Birds Need Nesting Boxes
In the wild, birds often nest in natural cavities—like holes in old trees or spaces in fallen logs. But with expanding urban development and fewer mature trees, those natural shelters are becoming harder to find.
That’s where a nesting box comes in. By offering a safe, weather-protected space to raise their young, you can directly support local bird populations. And the benefits go both ways—birds help control pests, assist with pollination, and bring life and energy to your garden.
Watching them build nests, feed their chicks, and take their first flights is not only fascinating but deeply rewarding for any gardener.
“After putting up a simple birdhouse last spring, two chickadees moved in within weeks. Watching their babies grow and fledge was the highlight of my summer.”
— Claire, home gardener in Ohio
Choosing the Right Nest Box Design
Different bird species have different nesting preferences. Features like entrance hole size, interior depth, and mounting height all influence which birds will move in.
If you’re just starting out, a general-purpose box is the best choice. A design with an entrance hole around 1¼ inches in diameter will attract chickadees, house wrens, and nuthatches—friendly, beneficial birds that are easy to host.
Once you gain confidence, you can try building species-specific boxes to attract birds like bluebirds, tree swallows, owls, or even woodpeckers, depending on your region and habitat.
Further Read: Wildlife-Friendly Garden
Materials and Tools You’ll Need
You don’t need fancy lumber or advanced tools to build a birdhouse. Most of what you’ll need is inexpensive and easy to find.
Recommended materials:
- Untreated wood (cedar, pine, or fir), about ¾ inch thick for insulation
- Galvanized screws — long-lasting and rust-resistant
- Non-toxic wood glue (optional, for added strength)
Avoid pressure-treated wood, interior paints, or stains. These often contain chemicals that can harm birds and their chicks.
Basic tools:
- Hand saw or circular saw
- Drill with assorted bits (for entrance and ventilation holes)
- Measuring tape
- Screwdriver (manual or powered)
- Sandpaper (medium to fine grit)
- Pencil and ruler
- Safety goggles
That’s all you need. With these simple materials and tools, you’re ready to build a birdhouse that’s safe, sturdy, and bird-friendly.
Step-by-Step Instructions
Building a bird nesting box is easier than it looks when you break it down into manageable steps. Follow this simple process to create a durable, weather-resistant birdhouse that’s safe and welcoming for your garden’s feathered visitors.
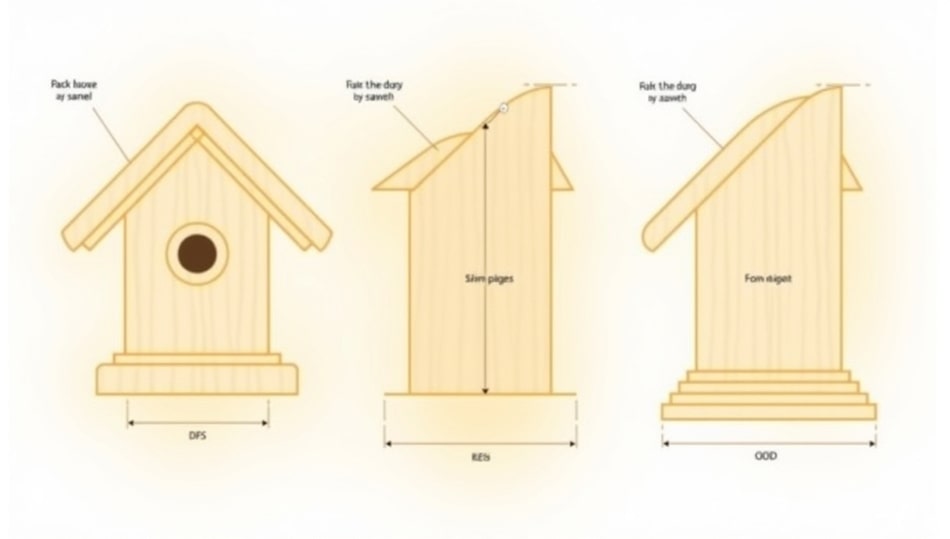
1. Measure and Cut the Wood Panels
Start by measuring and cutting all the pieces for your birdhouse. Use a pencil to mark your dimensions clearly on the wood, and a hand or circular saw to make clean, straight cuts.
Recommended dimensions:
- Back panel: 10–12 inches tall
- Front panel: 9–11 inches tall (with the entrance hole)
- Side panels: Around 8 inches tall, matching the front and back slopes
- Floor: Slightly smaller than the box interior to leave drainage gaps
- Roof: Large enough to extend at least 2 inches beyond the front edge for rain protection
Tip: Lightly label each piece after cutting to stay organized.
Always double-check your measurements before cutting—small errors can affect how the box fits together.
2. Drill the Entrance Hole
On the front panel, measure and mark the center, then drill the entrance hole.
- Suggested diameter: 1¼ inches — ideal for chickadees, wrens, and other small birds
- Hole placement: About two-thirds of the way up from the bottom
After drilling, smooth the inside and outside edges of the hole with sandpaper. This prevents sharp surfaces that could injure birds as they enter and exit the box.
3. Assemble the Nesting Box
Now it’s time to put your birdhouse together:
- Attach the side panels to the back panel using galvanized screws.
- Secure the floor panel at the base, leaving small open corners or drilling tiny holes for drainage.
- Install the front panel with the entrance hole already drilled.
- Attach the roof panel last, ensuring it overhangs the front to help keep out rain.
Note: Screws are stronger than nails and make future repairs or adjustments easier.
4. Add Ventilation and Drainage
Proper airflow and moisture control are essential for a healthy nesting space:
- Drill two or three small holes near the top of each side panel for ventilation.
- Ensure drainage by leaving gaps at the floor corners, or drill tiny holes through the floor if needed.
These features help prevent mold, overheating, and soggy nesting materials—common issues that can deter birds or harm chicks.
5. Create an Access Panel for Cleaning
Birdhouses should be cleaned out once per year, so design one part of the box to open easily.
- Add a small hinge to the roof or one of the side panels.
- Use a simple hook-and-eye latch or screw to keep it securely closed during the nesting season.
This makes seasonal cleaning quick and safe—for both you and the birds.
6. Smooth the Surfaces — But Don’t Paint!
Before installing your birdhouse, sand down the exterior and any sharp edges. Focus on corners and areas where birds will perch or enter.
Avoid using paint, stain, or sealant—especially inside. Even exterior finishes can leach harmful substances, and most birds prefer the look and feel of natural, untreated wood.
If you must weatherproof the outside, use a bird-safe natural oil, and apply it only to the exterior—never inside the nesting area.
“I was worried about building my first birdhouse, but following a basic plan with just a few tools made it much easier than I thought. Now, I have three houses up, and wrens visit them every year.”
(— Jake, beginner DIYer)
Where and How to Install Your Birdhouse
Once your nesting box is complete, choosing the right place to install it is just as important as how you built it. A well-placed birdhouse will attract more birds and help keep them safe from harsh weather and predators.
Tips for ideal placement:
- Mount at the right height: Position the box 5 to 10 feet above the ground. This range works well for most backyard species and protects nests from cats and other predators.
- Face the entrance wisely: Point the entrance hole away from prevailing winds. In most regions, facing it east or southeast offers protection from wind and rain while allowing in morning sun.
- Choose a quiet, sheltered location: Look for a spot with nearby shrubs or trees where birds can perch and feel secure.
- Secure the box firmly: Attach it tightly to a post, tree trunk, or pole.
- Add protection from predators:
- Install a predator guard if you’re mounting the box on a pole.
- Trim overhanging branches that could give squirrels or raccoons easy access.
- Avoid high-traffic areas like walkways or patios.
- Avoid hanging it with ropes or chains—swinging can stress birds and cause them to abandon the nest.
A stable, sheltered location encourages birds to nest—and return—year after year.

Birdhouse Maintenance Tips
Once nesting season ends, a bit of simple upkeep will keep your birdhouse safe, clean, and inviting for years to come. Here’s how to take care of it:
1. Clean out old nests
In late summer or early fall, after nesting is finished, open the box and remove any leftover materials. This helps prevent parasites, mold, and disease—and discourages pests like mice from moving in.
2. Inspect for wear and damage
Check the structure for loose screws, cracks, or weather damage. Tighten any hardware and replace worn parts to keep the box safe and sturdy.
3. Disinfect when necessary
If you notice signs of mites or illness, clean the box with a mild solution of 1 part bleach to 9 parts water. Rinse well and let it dry completely before closing it up.
4. Keep the entrance clear
Check that the entrance hole stays open and unobstructed. During the off-season, insects like wasps may try to build inside. Clear any debris to ensure it’s ready for returning birds.
Seasonal maintenance protects the birds and increases the chances that your box will be reused year after year.
“The first year, I forgot to clean out the birdhouse, and no birds came back the next season. Now I always clear out nests in the fall, and the box fills up again every spring.”
— Maria, backyard birdwatcher
The ideal time is late winter or early spring, just before the nesting season begins. However, putting it up later in the year can still offer birds shelter during bad weather.
It’s best to leave it natural and unpainted—especially on the inside. Paints and stains can contain chemicals that are harmful to birds. Most birds also prefer the texture and appearance of untreated wood.
Clean it out once a year, usually in late summer or early fall. More frequent cleaning may disturb nesting birds and usually isn’t necessary unless it’s being reused immediately.


